Book Appointment Now

A blind and buried via cost breakdown: which process steps carry the premium, how the ladder moves as stage count rises, and when the extra spend pays back.
Blind and Buried Via Cost: Why the Premium Steps Up With Each Stage
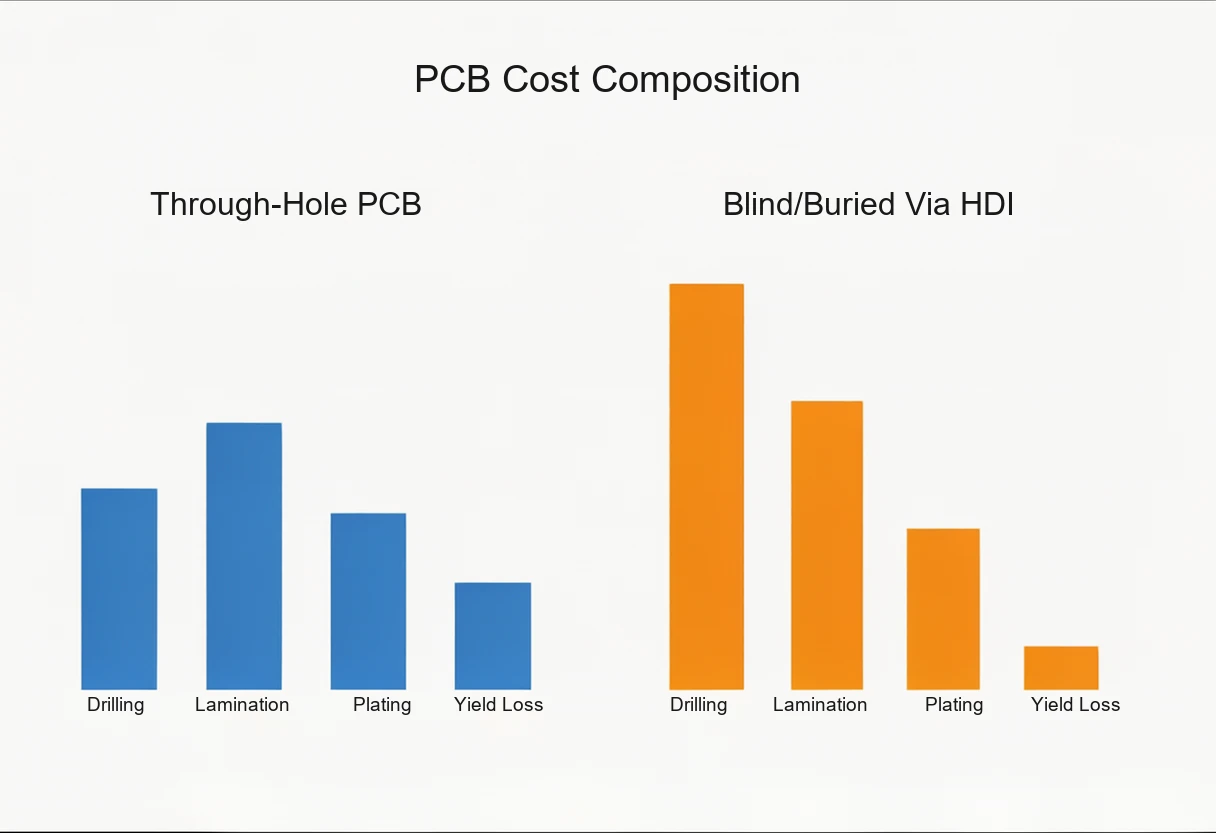
Blind and buried via cost is the number most HDI quotes leave until the last line, and the number buyers most often misread as a flat markup on a through-hole board. It is not flat. The premium tracks one variable almost linearly: how many times the panel has to be laminated, drilled and plated again. A board that carries buried vias only is a modest step up; a two-stage build is a different category of spend; a three-stage or any-layer build is priced as its own project.
This article breaks the premium into the four process consequences that create it, shows how the ladder moves as stage count rises, and sets out where the extra spend buys density you cannot get any other way and where it buys nothing at all. All figures are expressed as relative multipliers against a through-hole build of the same layer count, because absolute pricing depends on your stackup, panel size and quantity.
Table of Contents
- What Actually Drives Blind and Buried Via Cost
- Through-Hole, Buried and Blind: What Each One Adds
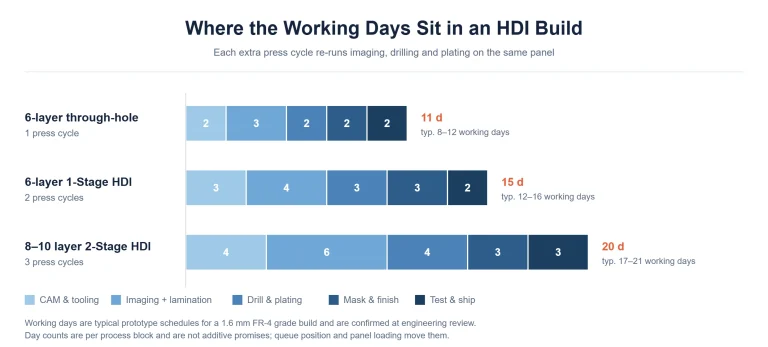
- Press Cycles Are the First Multiplier
- Laser Drilling and Via Fill Are Separate Cost Centres
- Plugging, X-Ray and Microsection Expand the Scope
- The Blind and Buried Via Cost Ladder by Stage Count
- Why Prototype Premiums Run Higher Than Production Premiums
- When Blind and Buried Vias Pay for Themselves
- How to Reduce Blind and Buried Via Cost Without Losing Density
- What to Send for a Quote You Can Compare
- FAQ
- Get the Stackup Reviewed Before You Commit to a Stage Count
What Actually Drives Blind and Buried Via Cost
Four process consequences create the premium, and only two of them are machine time. The first is the number of lamination cycles: every build-up layer pair adds a press cycle, and a press cycle is a booking on a press, not a step that can be squeezed into another shift. The second is laser drilling, which replaces a fast mechanical hit with a slower, programmed, per-pass operation on equipment that is far more expensive per hour.
The other two are yield and inspection. Registration between layers tightens as stage count rises, so scrap risk rises with it, and every scrapped panel takes all the work already invested in it. Inspection then widens: advanced HDI builds usually carry X-ray registration checks and coupon microsections that a through-hole lot does not need. Add those four together and you have the ladder.
This is why a single percentage cannot answer the question. The same board quoted at two stage counts can differ by more than the difference between a through-hole build and a one-stage build, and the largest share of that difference is not material – it is calendar time on constrained equipment.
Through-Hole, Buried and Blind: What Each One Adds
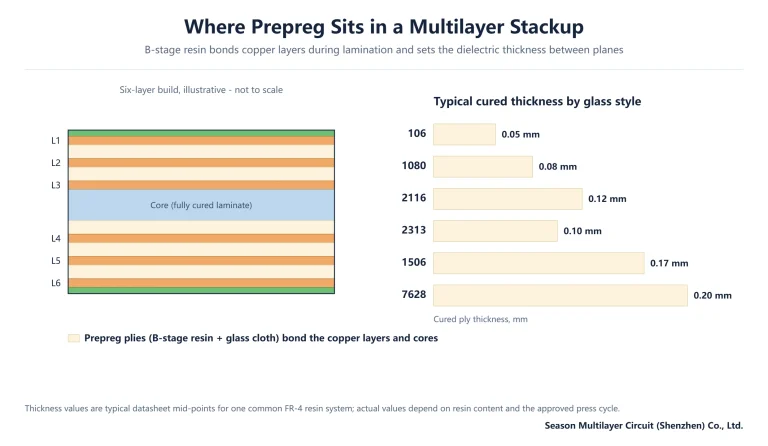
A through-hole via is drilled after the layers are laminated, so one drill pass, one plating pass and one press cycle serve the whole board. A buried via connects inner layers only and must therefore be drilled and plated while those layers are still a separate sub-assembly, which forces a second press cycle to bond the sub-assembly to the outer layers. That single extra press is the entire cost difference between a through-hole board and a board that carries buried vias.
A blind via connects an outer layer to the next inner layer and stops there. It is more expensive than a buried via for two reasons: the hole is small – typically 0.1 to 0.15 mm – which puts it beyond what a mechanical bit can hold reliably, and the same laser has to make a separate programmed pass for each side of the board. A board usually carries both types at once, which is why the trade uses the combined term blind and buried via HDI.
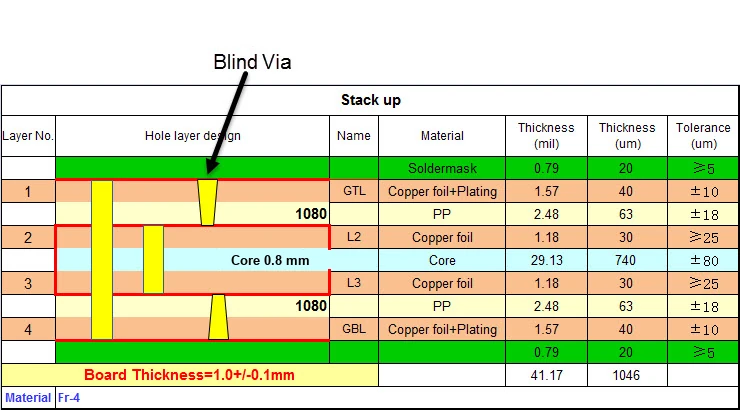
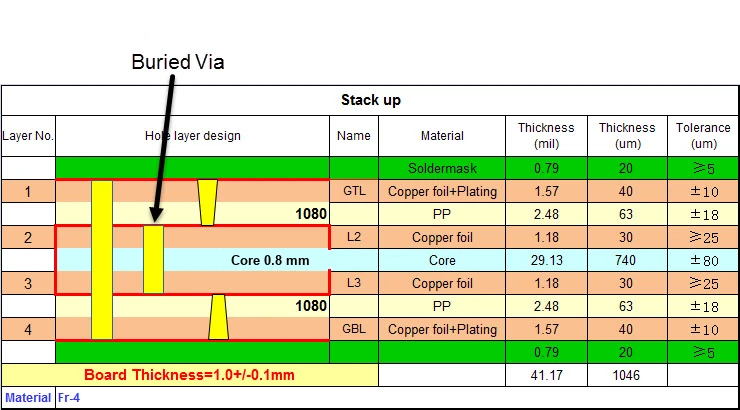
The cost ordering that follows is through-hole, then buried, then blind, then stacked microvia. Each step to the right buys routing density on the layers it touches and costs a press cycle, a drilling pass or both. Nothing in the ordering is arbitrary, and nothing in it depends on which fabricator you ask – only the multipliers move.
Press Cycles Are the First Multiplier
Every press cycle is a full lamination: lay-up, press, cool-down, then drills and plating before the next build-up can go on. A through-hole board uses one. A board with buried vias needs at least two, because the sub-assembly must be finished before it is bonded into the final stack. A one-stage HDI build uses two, a two-stage build three, and a three-stage build four or more.
| Build | Press cycles | Laser drill passes | Via fill | Relative spend vs through-hole |
|---|---|---|---|---|
| Through-hole, 6-layer | 1 | None | Not required for routing | Baseline |
| Buried vias only | 2 | None or mechanical | Optional | Roughly 15–30% higher |
| 1-Stage HDI | 2 | 1 per side | Required on microvias | Roughly 30–60% higher |
| 2-Stage HDI | 3 | 2 per side | Required, stacked where specified | Roughly 60–100% higher |
| 3-Stage and above | 4+ | 3+ per side | Required, tight dimple spec | From 2× upward |
Two secondary effects push each cycle further than the raw press time suggests. Registration tolerances accumulate across cycles, so the fabricator has to hold lamination control tighter than on a single-press board. And each cycle re-enters the queue for drilling and plating, which means the board passes through the same constrained equipment several times rather than once.
Practically, this is the lever with the most money attached. Dropping one stage removes one press cycle, one laser pass per side and one round of drilling and plating. That is why design reviews on HDI boards spend so much time on whether the second stage is actually needed by the fanout, and so little time on the laminate.
Laser Drilling and Via Fill Are Separate Cost Centres
Blind vias in the 0.1 to 0.15 mm range are made with CO2 or UV laser drilling. The equipment hour is expensive, the hole position has to be programmed per layer pair, and the panel has to be tooled and registered for each pass. A two-stage build does not simply double the laser work of a one-stage build – it adds a second set of programs, a second registration setup and a second quality gate.
After drilling, the microvia has to be filled. Filling is not cosmetic: an unfilled or partially filled via traps process chemistry during subsequent wet steps, and it leaves a void under a BGA pad that shows up later as a solder joint failure. Via-in-pad designs push the requirement further, because the pad surface itself must end up flat enough to place a component on. That means plating parameters dialled in for the specific hole geometry, and it means a dimple specification that has to be held panel after panel.
Together, laser drilling and via fill are the two cost centres that scale with stage count and with via density. They are also the two that respond best to design discipline: reducing the number of distinct microvia sizes in a design, and keeping via-in-pad to where thermal or routing needs it, both cut real machine time.
Plugging, X-Ray and Microsection Expand the Scope
Blind and buried boards carry stricter plugging requirements than through-hole boards. Resin plugging is used to keep chemistry out of the via barrel and to stop solder wicking away from pads on the far side; plated closed vias are used where the pad must be flat. Both cost more than a simple mask-ink fill, and both add bake and planarisation steps. The difference between resin plugging and mask-ink plugging is a process choice with a direct cost consequence, not a cosmetic one.
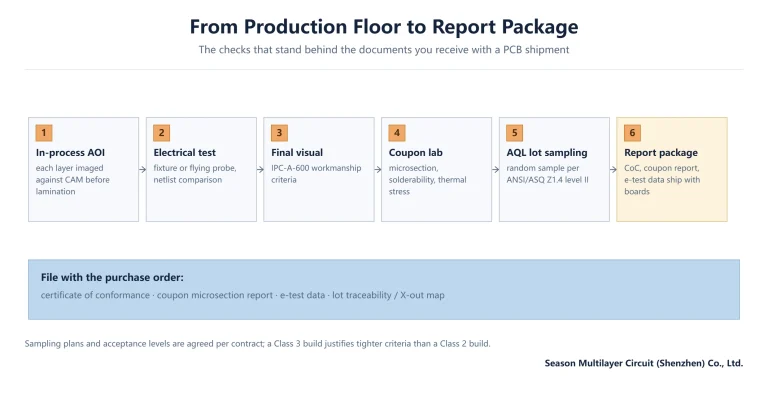
Inspection widens for the same reason. X-ray registration checks verify that each build-up layer landed where the stackup drawing says it should, coupon microsections verify the dielectric thickness and via wall integrity, and both are per-lot activities that a through-hole board can often avoid. Where an impedance requirement sits on the same board, the coupon work adds another layer of test.
These items look small against lamination and laser time, but they behave like a fixed charge: they apply whether the order is five panels or five hundred, which is exactly why they matter more on prototypes than on production.
The Blind and Buried Via Cost Ladder by Stage Count
Collapsing the four factors into one table gives the ladder buyers can actually plan against. The batch column assumes a stable, repeated build; the prototype column assumes a first article where tooling, programs and process trials are spread across a handful of panels. Both are expressed against a through-hole board of the same layer count.
| Via configuration | What gets added | Typical batch premium | Typical prototype premium |
|---|---|---|---|
| Buried vias only | Inner-layer sub-assembly, second press, second drill and plate | 15–30% | 20–40% |
| 1-Stage blind vias | Laser drilling per side, via fill, resin plugging | 30–60% | 40–70% |
| 2-Stage blind and buried | Third press, second laser pass, stacked via fill | 60–100% | 80–120% |
| 3-Stage and any-layer | Fourth press and beyond, fine-line imaging, tight registration | 2× and above | Quoted per project |
Read the ladder as a planning tool rather than a price list. It tells you the order of magnitude of the decision you are making when you add a stage, and it tells you that the jump from one stage to two is usually larger than the jump from through-hole to one stage. What it cannot tell you is your number, because panel utilisation, via count and acceptance class all move the result.
Why Prototype Premiums Run Higher Than Production Premiums
Almost every fixed cost in an HDI build is incurred once and then amortised. Films, laser drilling programs, press recipes for each cycle, plugging trials and first-article microsections all exist whether you build ten panels or a thousand. On a prototype those costs land on a small quantity, which is why the prototype premium column sits roughly a step above the batch column at every rung of the ladder.
| Cost element | Behaviour on a prototype | Behaviour at volume |
|---|---|---|
| Films and artwork | Full set, charged once to a few panels | Spread across the order |
| Laser drill programming | Per layer pair, per via size | Amortised, only changed on revision |
| Press recipe development | Trial panels per cycle | Runs on the qualified recipe |
| Plugging and planarisation setup | Machine trial to hit the dimple spec | Runs as standard |
| Registration and yield learning | Scrap concentrated in the first lots | Yield curve stabilises |
The practical consequence is that a prototype quote is a poor predictor of a production price, and comparing two fabricators on prototype price alone rewards whoever is thinnest on first-article work. Compare the stackup logic, the via structure and the inspection scope first, then compare the numbers on a like-for-like basis.
When Blind and Buried Vias Pay for Themselves
The premium is worth paying when the via structure solves a problem nothing else solves, and worth refusing when it substitutes for a layer-count decision that has a cheaper answer. The table below is the decision set we use most often in stackup reviews.
| Requirement | Recommendation | Reason |
|---|---|---|
| BGA pitch below 0.4 mm, escapes cannot be routed | Blind vias with via-in-pad | Through-hole fanout does not physically close |
| Product envelope too small for the required routing | Blind and buried vias plus fewer layers | Trading layers for stages often lowers total cost |
| High-speed nets entering an inner layer directly | 1-Stage blind vias | Shorter via stub, better return path |
| Density shortfall that extra layers can absorb | Through-hole plus more layers | Adding layers is usually cheaper than adding a stage |
| Prototype still proving the architecture | Through-hole build first | Defer the HDI spend until the netlist is stable |
The second row deserves attention because it is counter-intuitive. An eight-layer two-stage board can be cheaper than a ten-layer through-hole board that does the same job, since the through-hole version needs two more layers of material and a bigger panel. Comparing the two on a per-square-metre basis, as described in how PCB cost per square metre is built, is the only fair comparison – and it has to include the board area the smaller stackup saves.
How to Reduce Blind and Buried Via Cost Without Losing Density
Most of the achievable saving sits in the design file, not in negotiation. These are the levers that consistently move an HDI quote, roughly in order of effect.
- Remove one stage where the fanout still closes. One fewer press cycle and one fewer laser pass per side is the largest single saving available.
- Prefer staggered microvias to stacked microvias unless the pad pitch forces stacking. Stacked structures need every layer pair filled and planarised; staggered structures do not.
- Cut the number of distinct microvia diameters. Each new size is a new program and a new plating recipe.
- Keep via-in-pad to the pads that need it for thermal or routing reasons rather than applying it across the design.
- Panelise for utilisation. On HDI work the difference between a good and a poor panel layout often exceeds the difference between two laminate options.
- Release complete data before the first build. First-article rework on a two-stage board is expensive because every cycle has to be re-qualified.
One lever that buyers often ask about does not exist: there is no cheaper route to a genuinely two-stage stackup by simplifying inspection. Registration and microsection work is what keeps yield predictable at that stage count, and cutting it moves risk into your incoming inspection instead of removing it.
What to Send for a Quote You Can Compare
Blind and buried via pricing is sensitive to details that are easy to leave out of an RFQ. Send Gerber data in RS-274X plus the drill files, and send the stackup drawing with the via span stated per layer pair rather than as a single note. State via diameter and whether each microvia must be filled and planarised, because that decision alone can move a quote by a visible margin.
Add the acceptance class you actually need against IPC-6012 and IPC-6013, the surface finish, any impedance requirement with its tolerance, and the quantity tiers you want priced. A quote built on that package can be compared line by line; a quote built on a Gerber and a layer count cannot.
If the stackup is still open, ask for the review before you commit. The most common outcome of that review is that one stage disappears and the design still routes – which is worth more than any percentage negotiated afterwards. Our HDI technology overview sets out the via structures and stackups we build routinely, and the stage-count comparison shows what each rung of the ladder requires in process terms.
Frequently Asked Questions
How much more does a blind and buried via board cost than a through-hole board?
It depends on the stage count rather than on the board. Buried vias only typically land 15–30% above a through-hole build of the same layer count, a one-stage HDI design 30–60%, a two-stage design 60–100%, and a three-stage or any-layer design at roughly double or more. Prototype quantities sit a step higher than batch because the fixed engineering work is spread over fewer panels.
What is the difference between a blind via and a buried via?
A blind via starts on an outer layer and stops at the next inner layer, so it is visible from one side only. A buried via connects two inner layers and is completely enclosed after lamination, so it is invisible on the finished board. Buried vias require the inner layers to be pressed and drilled as a sub-assembly, which is why they add a press cycle, while blind vias add laser drilling and via fill.
Do blind vias always need laser drilling?
At the diameters used in volume HDI work, yes. Once the hole drops below roughly 0.15 mm and the depth is a single dielectric layer, mechanical drilling cannot hold position and depth reliably, so CO2 or UV laser drilling is used. Larger blind vias in thicker dielectrics can sometimes be mechanically drilled, but that decision is made by the fabricator against the specific stackup and is not a general cost lever.
Why is a two-stage HDI board so much more expensive than a one-stage board?
Because everything that makes a one-stage board more expensive gets repeated. A two-stage build adds a third press cycle, a second laser pass on each side, a second round of drilling and plating, and usually stacked via fill with a tighter dimple specification. Registration tolerances also accumulate across the extra cycle, which lowers first-pass yield and puts more of the cost into scrap.
Can I cut the cost by using fewer HDI stages?
Often yes, and it is the first thing to test. If the BGA fanout still closes after removing one build-up layer pair, the saving is a full press cycle plus a laser pass per side. The limit is physical: below about 0.4 mm pitch a through-hole fanout does not close, so the stage is buying routing capacity rather than convenience. Ask for a stackup review with both options quoted.
Does the premium shrink at production volumes?
Yes, but not to zero. Films, laser programs, press recipes, plugging trials and first-article microsections are incurred once and can be spread across the order, so the percentage above a through-hole board falls as quantity rises. The recurring part of the premium – press cycles, laser time, via fill, resin plugging and the wider inspection scope – stays with the design, because those costs are per panel rather than per order.
What information does a fabricator need to quote blind and buried vias accurately?
Gerber data in RS-274X with drill files, a stackup drawing that states the via span for each layer pair, via diameter and whether each microvia must be filled and planarised, the acceptance class against IPC-6012 or IPC-6013, surface finish, any impedance requirement with tolerance, panelisation preference, and the quantity tiers you want priced. Missing any of these usually produces a quote that cannot be compared with another.
Get the Stackup Reviewed Before You Commit to a Stage Count
We build from 2 to 30 layers with one- to four-stage HDI and blind and buried via structures as standard, and the stackup review is where most of the money in an HDI quote is decided. Send your Gerber files and stackup drawing with the via spans marked per layer pair, and ask for both the current stage count and one stage less to be priced side by side – that comparison is usually the most useful document in the whole project.